Contractor's Corner | Dave Yates
Troubleshooting common airflow plumbing issues
Gone with the flow: Gasping for air!
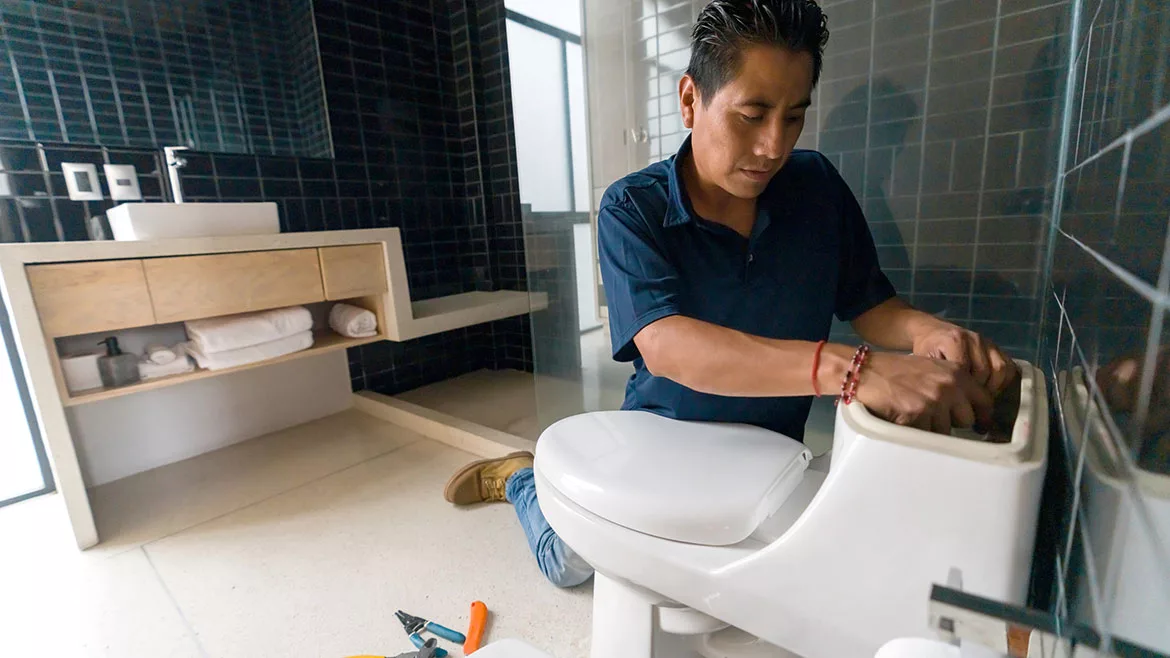
No airflow from the vent created a vacuum whenever the 5-gallon-per-flush toilet was ejecting its slug of wastewater! Easy-peasy, right? Wrong! Image courtesy of Hispanolistic / E+ / Getty Images
Every time we try flushing our toilet, it just swirls around the bowl and ever so slowly goes down. Does it do this on every other flush? No. Well, that ruled out an after-fill tube having slipped off of the overflow tube and, sure enough, once on site with tank lid removed, the ballcock’s after-fill tube was securely inside the overflow tube. Inspection also revealed the ballcock’s copper after-fill was inserted no more than an inch into the overflow tube to avoid siphoning the tank’s water level to a point where the toilet would continuously run, thereby wasting water. Utilizing my trusty telescoping inspection mirror and flashlight, I checked to see if perhaps a foreign object was hung up inside the trapway, but nothing was present. The tank’s water level was right at the designated fill-line, so that, too, was ruled out.
The lavatory sink and tub/shower fixtures both exhibited no issues with respect to freely draining and neither trap gurgled or sucked for air when the toilet was flushed. Before pulling the toilet, I tried vigorous plunging with a force-cup just in case something blocking the free passage of water could be dislodged. No dice. After removing water from both tank and bowl, disconnecting the supply connection and closet bolts, the toilet was turned upside-down onto a cloth tarp and it was revealed the wax gasket was secure, in its proper place and had not been either jammed up inside the trap-way by the closet horn bisecting it during installation, which would have impeded the flushing action, nor was it off-center partially blocking the closet flange opening.
Was it something partially blocking the drain line itself? The first thing I saw was that this closet ell was a heel outlet fitting, which, as we all know, has been long outlawed and I was about to discover why. A visual check with mirror and flashlight indicated there was no obstruction between the heel outlet closet bend and the vertical stack. Turning the mirror to inspect the vent piping revealed a transition from cast iron to galvanized piping. Reflecting the flashlight’s beam off o0f the inspection mirror revealed the galvanized vent was filled with scale/rust where it met up with a 90-degree elbow. No airflow from the vent created a vacuum whenever the 5-gallon-per-flush toilet was ejecting its slug of wastewater! Easy-peasy, right? Wrong! Try as I might, my powered auger, while utilizing a variety of heads, could not chew or grind its way through that impacted and rusty pile of galvanized debris. Ladder set up, it was time to attempt busting through from the top of that clog. After repeated attempts, I finally managed to break through and then used my trusty shop vacuum to remove the debris from within the heel outlet’s vent line. Once reassembled, the toilet flushed like a champ!
Blocked by water
Same issue, different day and different home. After going through much the same checklist as outlined above, and knowing this home had been built long after heel outlet closet bends were outlawed, I wanted to listen to the flushing action before pulling the toilet. In my area, we are required to install house trap sets within five feet of the 4-inch main drain leaving the home. If you’re not familiar with a house trap set, it consists of, in the direction of flow towards the municipal sewer main, a sanitary tee laid on its back, a house trap, which is simply an inline full-sized P-trap followed by a wye and eighth bend serving as a future cleanup access point. The sanitary tee has a fresh-air vent pipe rising vertically that terminates a minimum of 1-foot above finished grade. The house trap and future both have risers that terminate at grade with a brass cleanout plug. The fresh air vent is topped off with a mushroom vent cap. There are two points where listening to the large volume of water from a flushed toilet can reveal much about the drainage lines: the fresh air vent and the future cleanout. In this case, listening while having the homeowner flush their toilet, you should be able to hear water leaving the toilet and its cascading down the line until it can be seen flowing through the sanitary tee. After passing through the house trap, you can listen at the future cleanout as the water flows toward the municipal sewer main, and the Niagara Falls sound as it cascades into the sewer main. The owner flushed the toilet and no sound could be heard at the fresh air vent at first followed by an echo-like noise, which only occurs if there is a blockage or belly in the line. A video inspection revealed there was an extended belly in the line under the slab. Carpet had to be removed, concrete saw cut/removed, and excavation to reveal the 4-inch PVC line had been installed over uncompacted fill ground with no crushed stone, indicating either no plumbing inspection or one where the plumbing inspector had missed the required crushed stone bedding. After excavating, compacting the earth with a pneumatic tamper, and installing the new PVC drain on crushed stone, properly inspected by the township’s plumbing inspector, our excavator then installed flowable fill, which sets up rapidly and enabled him to install finished concrete. The owners had been wanting new hardwood flooring installed in place of their carpeting and were happy to have waited until their poor flushing toilet issue was resolved.
On a hunch, I had him remove its contents so I could remove the four screws holding the cabinet in pace and pulled it out of the wall. Now exposed for all to see was the PVC vent severed below and above where the medicine cabinet had bisected its vertical journey!
Sewer gas odors persist
A friendly competitor called asking if I would go to a home with him to check on a persistent sewer gas odor issue that had both him and the homeowners frustrated. Roy, the plumber, had pulled and replaced the closet gaskets repeatedly. All traps had been checked and double checked. Vent lines had been angered as had all drains from fixtures to stacks, from stacks to inside horizontal drains, and from inside the home to the septic tank. The septic tank had been pumped, the distribution box exposed and examined, and drainage field certified as fully functional. In short: no stone had been left unturned! Over many decades, I had been confounded by this exact scenario more than a few times and had successfully resolved the issue without having to gut the home to expose its DWV systems for a forensic examination while finally determining which joint or cracked pipe was allowing sewer gas to escape under varying atmospheric conditions. The homeowners in this case, as I too had experienced, were not willing to have beautifully wallpapered walls cut open nor concrete floors cut open in an exhaustive and very expensive hunt for sewer gas odor emitting culprits - especially where no absolute guarantee could be provided. Although somewhat controversial in some opinions, and possibly not condoned by the AHJ (authority having jurisdiction), there is one surefire option for halting sewer gasses in their tracks: installation of the afore mentioned house trap set with its built-in water barrier P-trap. Installed and the sewer gas odors were no longer present within the home.
Mysterious and elusive sewer gas odor
The homeowner was frustrated and agitated. After paying for their new addition, there was an occasional sewer gas odor near their foyer. This created a highly embarrassing situation when hosting visitors who would be gob smacked by the foul, eye-watering atmosphere upon entering the home. To make matter worse, the nasty odors would dissipate for days, only to announce their invisible presence at the most inopportune embarrassing moments. There was a half bath adjacent to the foyer, but no odors were present when I arrived. “Another plumber has already installed a new gasket under the toilet.” The P-trap under the vanity was new as well. I noticed a small bit of drywall dust clinging to the wallpaper by the medicine cabinet. I asked if the medicine cabinet had been there since the addition had been built. “No, it was recently added.”
On a hunch, I had him remove its contents so I could remove the four screws holding the cabinet in pace and pulled it out of the wall. Now exposed for all to see was the PVC vent severed below and above where the medicine cabinet had bisected its vertical journey! The medicine cabinet completely filled the void between wall studs, so choices were limited for resolving the gap. Open the wall and install a vent bypassing the medicine cabinet, install a mirror covering the wall opening and reconnect the severed vent piping, or cap off the open vent piping and install an AAV, which was accomplished by removing the vanity, cutting open the wall, installing an offset into the vanity, reinstalling the vanity, and finally installing the AAV on a riser inside the vanity. Less than ideal because the AAV’s gasket is below the flood level rim of the sink, but the local plumbing inspector approved this resolution. The homeowner signed off on liability and understood the potential for leakage of water and/or sewer gasses when the AAV’s gasket eventually needs to be replaced.
Looking for a reprint of this article?
From high-res PDFs to custom plaques, order your copy today!


