Contractor's Corner | Dave Yates
Repairing a 30-year-old hydronic system after construction damage
Be prepared.

Images courtesy of Dave Yates
How do you deal with damaged embedded-in-concrete PEX tubing? Read on to find out the challenge I met and resolved.
The Boy Scout Motto certainly would be fitting when describing my first design and installation of the hydronic radiant system in our forever home Lois and I were building in 1992-1993. I grew up with the incredible warmth and comfort of hydronic heating and a toasty warm cast iron radiator by my knees in my bedroom built-in desk where I studied and did homework. When I moved out, my apartment had forced warm oil-fired air, as did the farmhouse where I lived for several years. I sure missed the comfort of hydronic heating! Our first home also had hot air heating. Yuck. Then we moved to a fairly new home with hot water baseboard — I added central air conditioning and a second bathroom (equity). We next moved to a temporary apartment with steam heating, which was controlled by old ladies who thought 90° F was the perfect indoor temperature! That move was required because we listed our home for sale and it sold a day later with the caveat we vacate within two weeks!
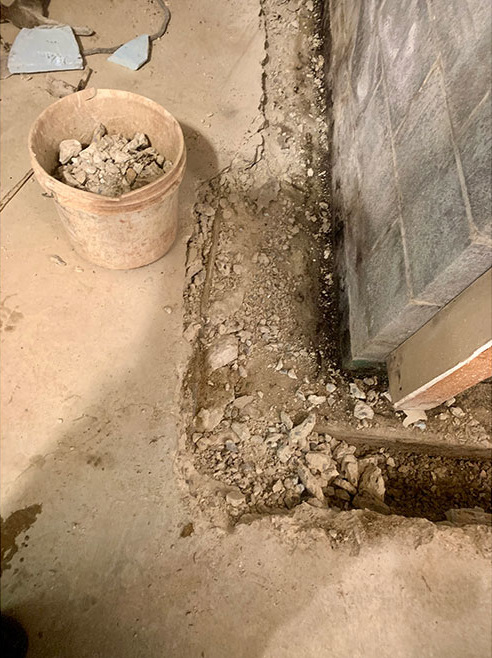
The basement concrete block walls eventually began taking on water after the sprayed-on tar along the exterior ended up no longer being completely waterproof. To fix the issue, workers had to break up concrete around the perimeter, drill holes in every web at the base of the blocks where they sit on the concrete footers, and install another collection system that would lead to a sump pit. Preferably, without damaging the radiant heating system within the floors!
The radiant journey
With a determination to incorporate 100% hydronic radiant heating for our forever home, I set out to learn as much as I could about designing and installing the system. Many of our customers had hydronic radiant heating systems installed in the 1940s. Their concrete-embedded tubing was black iron piping and local architect Jack Spotts had designed the systems. Meticulous drawings that accurately depicted the location of every loop were often available, in spite of them being decades old with multiple homeowners. Hearing those homeowners extol the virtues of having luxurious hydronic radiant heat was embedded in my mind.
Studying radiant heating in 1992 was fascinating. One raging controversy back then was whether, or not, to use oxygen barrier tubing. Logically, it seemed to make sense to minimize the oxygen content, which should extend the life of ferrous components, like iron-bodied circulators, pipe, and fittings. Seeing the advanced degree of sludge generated in older steam system wet-return piping impressed upon me the degree to which free oxygen, water and iron had the potential to gum up the works. Lord knows, I had witnessed the corrosion sludge buildup in cast iron hot water boilers first-hand. Now, I’m contemplating thousands of feet of 1/2-inch diameter PEX tubing with low flow where suspended particles would be likely to collect. While more expensive, I was an easy self-sell for the O2 barrier PEX. What brand should I purchase for the several miles of tubing our home would require? Local salespeople I trusted recommended Wirsbo and that was also in stock, which cinched the deal. Wirsbo, now Uponor, was PEX-a. PEX tubing had only become available here in the USA in the early 1980’s, so to my way of thinking it was still the new kid on the block. However, it had been widely used in European countries for decades, so there was a pretty reliable track record to gain my trust.
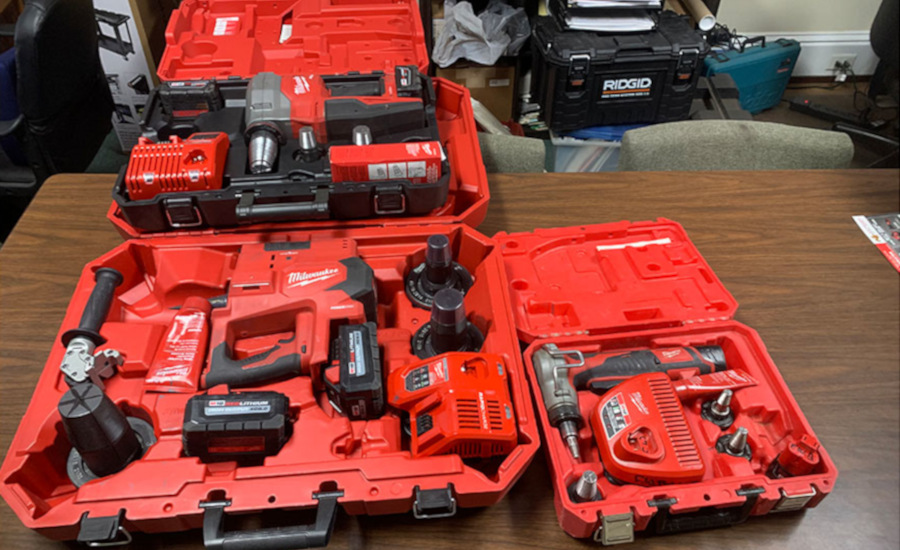
With incredible foresight, Dave Yates had the Milwaukee Tool PEX expander and Uponor ProPEX fittings on hand to fix any damages in case they occured.
House plans finalized, it was time to break ground. My hydronic system had blossomed into 10 zones, plus one more for the indirect hot water storage tank. Outdoor reset was incorporated for energy conservation. My first boiler (my home is my mad hydronic scientist laboratory and my family the unwitting participants) was a high-head high-efficiency non-modulating non-condensing direct-vent boiler. My zooning was accomplished with circulators. No real thought about energy consumption on the electrical side until much later.
We hit a spring while digging for the foundation, which required we raise the home by two-feet! My concrete footers could support a multi-story hotel! Realizing water that comes in contact with a radiantly heated slab would mean the heat would go into the water rather than our occupied living areas, I installed 1,200-feet of perforated drainage schedule 20 PVC piping with the holes facing down. The drainage piping wraps around both the exterior and interior of the footers with interconnecting crossovers every 20-feet. Inside, there are horizontal runs front-to-back every 10-feet and a 6-inch collector line to gather all drainage, which spills on grade by our pond.
Above the crushed stone, I installed a 4-mill plastic moisture barrier then 2-inch thick high-density Dow boards and over that is a 6x6-inch wire grid using flay sheets instead of a rolled coil because I had seen and read about issues getting the coiled steel mesh to lay flat. One benefit of using the 6x6 wire grid is that dimension transfers perfectly to house plans where 1/4-inch = 1-foot. Graph paper designed for this purpose allows you to see the underlying lines for walls, doors, and room layouts. Although today you can generate cad drawings in a matter of minutes, in 1992-1993, we did not have computers much less the amazing design programs of today.
Best laid plans
I thought I was prepared. Our home is banked into the hillside, so our daylight basement is essentially underground where our storage area is located. That’s also where the underground spring is located. What I did not know then was our concrete block walls being set on concrete footers would eventually begin filling with water as the exterior sprayed-on tar would develop openings. Effervescence and mold began accumulating on the surfaces. It was going to be necessary to break out the floor’s perimeter and install a collection system. Drilling a drainage hole in every web of each block below the floor where they sit on the footers was necessary. Only thing is I have radiant tubing under that floor in the first of two back storage rooms — yikes! Be prepared — I was! Rolling out my original house plans, I clearly illustrated exactly where my Wirsbo/Uponor PEX-a tubing was located.
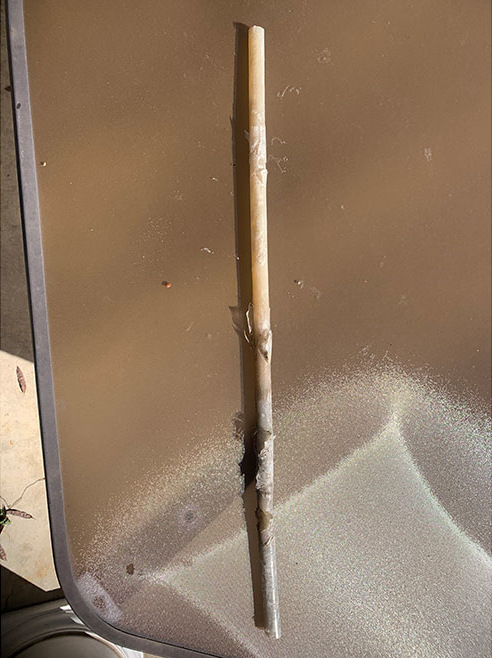
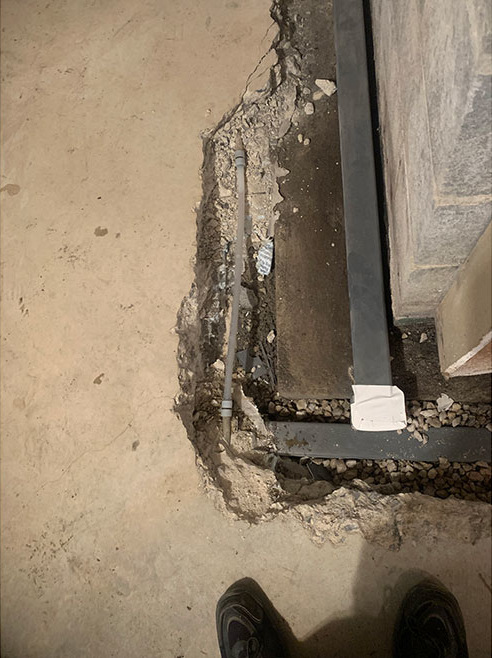
Damaged PEX from the radiant heating system in the basement of the Yates home.
Communication is everything! Listening helps, too. I showed the sales guy my radiant tubing layout where they would be breaking out the concrete floor. Along the exterior wall, the first run of PEX-a is just 6-inches away and he reassured me the tubing would be spared from damage. Every one of my PEX-a loops has isolation valves, and I turned them off to isolate that loop. One distinct advantage of having Uponor PEX-a tubing is it can be expanded to utilize ProPEX rings and fittings. I ordered expansion rings, couplings and elbows in advance to have on hand and a coil of PEX-a Uponor tubing. The only question in my mind was what condition 31-year-old PEX-a tubing might be in after being entombed in concrete for decades. Batteries charged on the trusty Milwaukee PEX expander tool, I was ready.
Sure enough, the concrete demo worker failed to heed my instructions regarding where the PEX-a tubing was located and punctured a short stretch multiple times before realizing his mistake and narrowing his demo area. He had been able to clear the area around the tubing so I could determine where the puncture holes had compromised the tubing and know where to cut. Snip-snip with the razor blade tubing cutter, slip on expansion rings, expand tubing and ring and slip in a coupling while holding it until the PEX-a memory closes on it securing it in place. Repeat for the other end of my decades-old tubing, which flexed like it was brand new! No apparent aging was visible, so off we go! Measured the gap, cut a new piece of Uponor PWX-a tubing, slip on rings, expand and slide over couplings – BAM! Total elapsed time was just over a minute.
One distinct advantage of having Uponor PEX-a tubing is it can be expanded to utilize ProPEX rings and fittings. I ordered expansion rings, couplings and elbows in advance to have on hand and a coil of PEX-a Uponor tubing. The only question in my mind was what condition 31-year-old PEX-a tubing might be in after being entombed in concrete for decades.
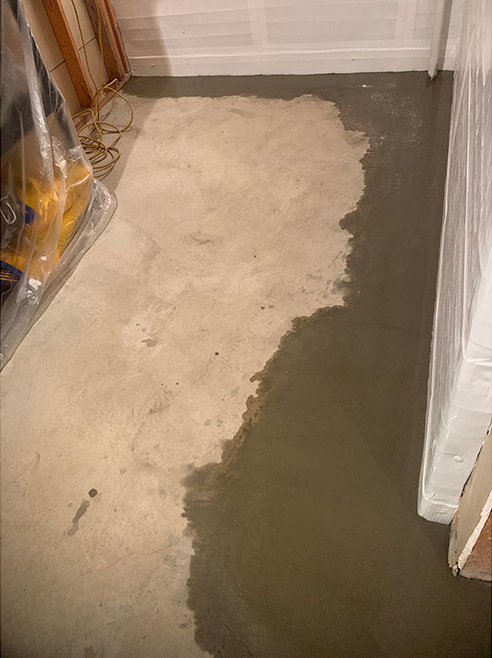
By the time I could access the isolation valves, all four expansion joints were leak-proof and I opened just one of the isolation valves to pressurize the loop, but did not want to circulate any fluid/air before flushing the loop. Then I upped the boiler’s pressure to 28-PSI, double-checked my repair joints (high and dry), and then isolated the hydronic system from the potable water to observe the pressure. After four hours, the pressure had not changed, so green light for installing new concrete.
All’s well that ends well. Being prepared, in advance, and anticipating possible tubing damage prevented having to operate in crisis mode when an emergency repair became necessary. Having utilized Wirsbo/Uponor PEX-a tubing with its ability to take advantage of ProPEX expansion rings and fittings made the repair a snap and the five guys on the basement-dry crew were amazed by how fast the repair was done.
After the new concrete cured, we covered the floor with epoxy paint, which gives it a nice finished look. Here’s to another 31-years, and more, for our PEX-a embedded low-temperature hydronic radiant comfort system we love dearly.
Looking for a reprint of this article?
From high-res PDFs to custom plaques, order your copy today!


