Toilet flange installation and repair
Best practices for plumbing pros.

Allkindza/E+ via Getty Images.
Whether you’re a new pro entering the industry or a seasoned plumber in need of a quick refresher, this article covers best practices when installing or replacing a new toilet flange; best practices when repairing a broken flange; and finally, toilet flange types and options.
Best practices when installing a toilet flange
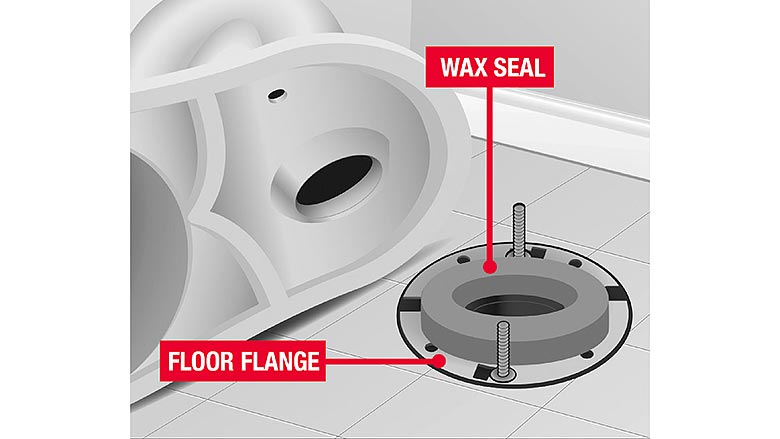
Pay attention to flange height: Proper flange height is key to preventing leak paths. A best practice is to install the toilet flange on top of the finished floor. If you install the toilet flange flush with the subfloor, or even below the subfloor, leak paths will form, because the flange won’t be at the correct height to accept the horn at the bottom of the toilet.
If you’re unable to install the flange on top of the finished floor, you can use spacers that mount on top of the existing flange, or even kits that allow you to install spacers under the toilet flange during installation to ensure the bottom of the flange is flush with the finished floor. When you install PVC spacers on top of a PVC toilet flange, you will solvent weld it together. Or you can use a 100% silicone sealant to make sure you have a watertight seal between the two layers.
Always use rust-proof screws to anchor the flange to the subfloor: Another important step to keep in mind is to use rust-proof screws when installing or repairing a toilet flange. We don’t recommend using drywall screws because they will deteriorate over time if they come in contact with water. At that point, movement can occur, the toilet flange can become damaged, and the pipe connection can become compromised.
Keep bolt slots clean and clear of debris: If you’re installing the toilet flange before setting the tile or the flooring, be sure to use painter’s tape to cover the slots where the toilet bolts will go. Some plumbers might even tape cardboard over the flange while setting the floor. That’s because mortar can easily enter these slots, causing you to have to spend unnecessary time trying to keep it clear of debris or clean it out before you’re ready to set the toilet.
Use a flange with a knockout or a mechanical test plug: The use of a closet flange with a knockout plug will depend on the application. For new construction or remodels, there are flanges with knockout plugs that allow you to test the system without having to use a test ball or plug, while also keeping sewer gases from escaping. The knockout plug will easily and cleanly break out, eliminating the possibility of falling down the sanitary sewer line after testing.
If you’re remodeling a bathroom and keeping the existing flange, a mechanical test plug will be the best option to keep sewer gases from escaping while work is being completed. A mechanical test plug fits inside of the flange and has a gasket that is expanded with a wing nut, providing an airtight/watertight seal.
Best practices when repairing a broken flange
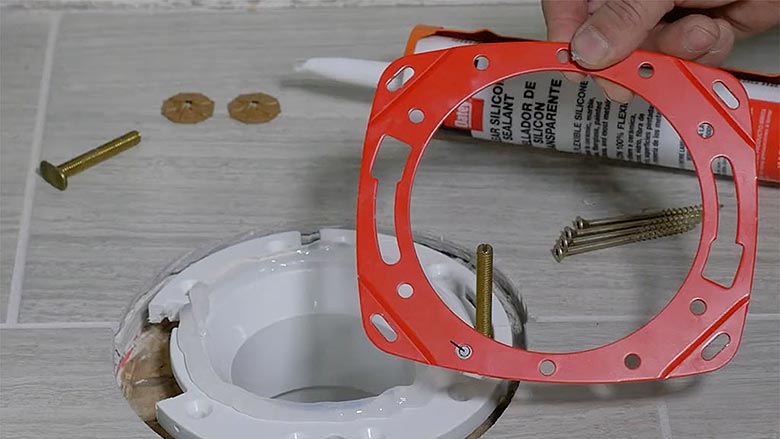
If just the flange is broken, you can use a convenient flange repair ring to securely reinstall the toilet. A product like this makes repairs easy, because it doesn’t require solvent cementing or any special tools to install. Instead, it can be installed above the broken toilet flange with four screws and silicone sealant.
Repairing a toilet flange — versus completely replacing it — results in faster installation because you don’t have to remove the existing flange and plumbing connection. For professionals, it will therefore result in a speedier service call, saving time and money.
Use the following steps to properly repair a broken flange using a flange repair ring, but please also read manufacturer instructions and recommendations on products to ensure best practices for safe and effective use.
- Remove broken or corroded sections of the flange. Loose pieces can be removed by hand. Then, apply a liberal amount of 100%-silicone sealant to the top of the existing flange;
- Press the repair ring down into the desired location for correct bolt alignment and secure the repair ring to the subfloor, using appropriate screws and anchors;
- Inset new T bolts — or as Oatey calls them, “Johni-Bolts” — into existing ring slots if still in place. Be sure the bolts are centered with the toilet flange opening and parallel with the wall behind the toilet tank;
- T bolts are used to connect the toilet (via slots) to the toilet flange. Secure Johni-Bolts to repair the ring, using the supplied fasteners; and
- Wipe off any excess silicone and allow time to cure.
This article details step-by-step instructions from assessing the problem to prepping the toilet to fixing the existing toilet flange. However, if you determine the flange is cracked beyond repair after an inspection, the next step would be to remove and replace the existing flange.
After removing an unrepairable toilet flange, it’s important to select the correct flange type for replacement, based on the pipe material. But before you head to your local supply house or the nearest hardware store to purchase a new toilet flange, let’s explore the different types to ensure you choose the correct toilet flange for your particular application.
Types of toilet flanges
Today’s market offers a variety of toilet flange types, based on material composition. Among some of the options are PVC, ABS, cast iron, brass or materials based on specific application needs.
The choice of toilet flange depends on the material of the DWV pipe it is being connected to. That means, if you have a PVC pipe connection, you should install a PVC closet flange. A cast-iron connection will require a cast iron toilet flange.
Some older homes may still have a lead bend in place, relying on a brass closet flange and requiring a more traditional connection method. While you may be familiar with this connection method, it involves peening the lead to the inside of the closet flange and joining the two materials together with solder. Most of the time, when repairing a brass flange, the lead material may have deteriorated beyond repair. If this is the case, the old lead bend will have to be replaced.
Specialty options
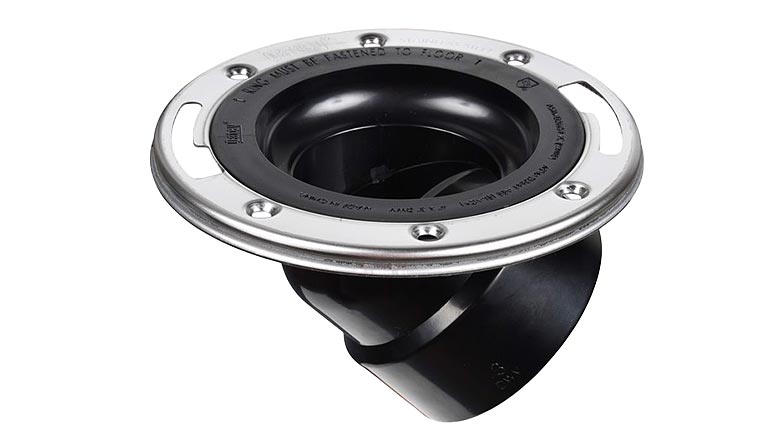
- 45-degree closet flanges (shown in Figure 3) are designed for applications in which clearance doesn’t allow for normal flange installation. The hub comes off the bottom of the closet flange at a 45-degree angle. This is helpful if there is an obstruction beneath, or if you need clearance where an application doesn’t allow direct attachment vertically into the closet flange.
- Offset closet flanges are used for PVC or ABS applications, the Oatey Level Fit Offset Closet Flange can be rotated for precise alignment of bolts and screws. The rings provide flexibility with a 360-degree swivel.
As a result, if floor joists prevent the closest flange from being centered during installation, the Level Fit Offset Closet Flange offsets the hub of the closet flange around that joist obstacle. That way, you can still install the toilet where it needs to go. This flange is available with a stainless steel or metal ring.
Now that we have explored some best practices and the different types of toilet flanges, you are set up to ensure a good seal and leak-free installation.
All figures courtesy of Oatey Co.
Looking for a reprint of this article?
From high-res PDFs to custom plaques, order your copy today!


