Dave Yates: Oh, my aching back!
Considerations for designing and installing radiant snow-melt systems

Snow is coming, and my back recoils in fear at the thought. I should have added snow-melting for our driveway, but I was 30 years younger when we built our forever home. Our home is the first of four on the private roadway, and our driveway entrance is 114 feet from the public road. We’re technically not part of the private enclave development, and for the past 28 years, the private roadway was cleared of snow and ice, and the owner/developer billed us for our share of the expenses.
However, that is not the case anymore as the three homeowners up-the-hill have been squabbling over the cost division for snow/ice removal. It finally got to the point where lawyers are involved and the owner/developer decided he was no longer handling snow/ice removal. It therefore became my job to handle snow/ice removal on the roadway from our driveway to the public roadway! No worries mate, I’ve got a snow blower. Like many folks, my wife and I have a sort-of serene pleasure doing snow removal. OK, we’re not normal! But as the years go by, I’ll freely confess my back is not as willing as is my spirit, and therein lies an opportunity for us all. If snow melt is not part not your business plan, it should be.
My garage floor has PEX tubing embedded in the concrete and high-density polystyrene insulation boards below the concrete — except for where our cars are parked. Why you ask? Excellent question! Hot goes to cold — always. That’s a universal and fundamental truth. Heating the ground doesn’t make sense, which is why we install R10 insulation boards (per code) below our radiant floors. Floors become more responsive, and heat energy goes to the living spaces instead of simply being absorbed by the ground, which will cause overheating due to what’s called the “Flywheel Effect.” Once the thermostat is satisfied, all that absorbed heat energy now begins its journey up through the floor, resulting in overshooting the thermostat’s set-point.
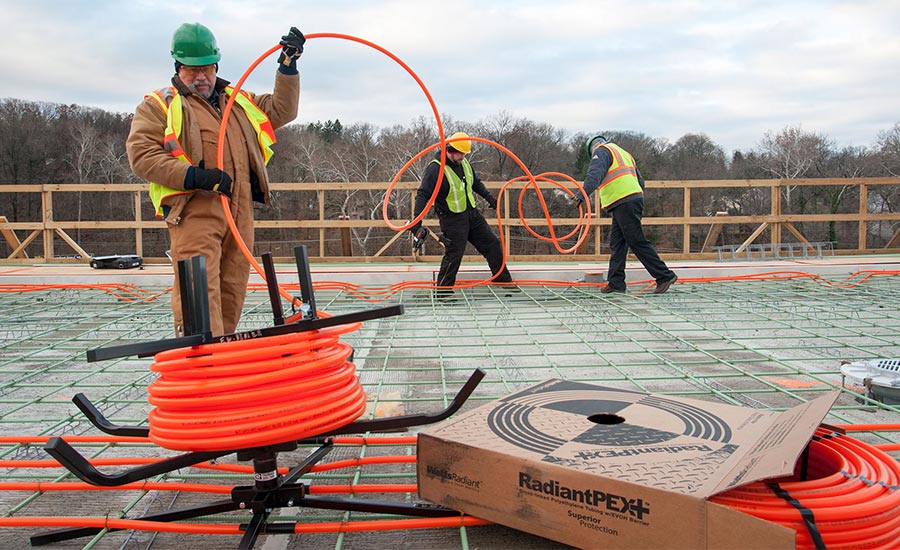
Photo courtesy of Dave Yates
While not desirable for living quarters, we take advantage of the added boost in snow/ice-melting in the garage when the tons of metal return laden with snow/ice from our winter’s journey. Insulate under where the cars will be parked and you’ll find the slab loses its heat too rapidly and the slop on the floor freezes over, creating a slip/trip/fall hazard. Runoff is also an important consideration for garages, and our builder was hesitant to follow my instructions for sloping the floor inward to where I installed the floor drain. Garage floors sloping toward the overhead doors need closely spaced tubing (or cables if electric) where the door seals meet the floor or else you’ll discover the melted water will refreeze and cause the garage doors to be frozen fast to the floor! With any snow-melt system, it is your responsibility to anticipate water runoff and how that will be accommodated.
In addition to high-density foam board, we use 6x6 wire mesh sheets for several reasons. Depending on the thickness of the concrete slab, you may need to install chairs (essentially metal frameworks for elevating the 6x6 wire mesh) so that your wires or tubing will be located within 2 inches of the slab’s surface. Why? To enhance response time because, dang it, when your customer activates a snow-melt system, they want results ASAP! The 6x6 grid translates well to 1/4-inch grid graph paper to document where your tubing or wire is in the floor, driveway, garage or sidewalk. Lastly, the 6x6 wire mesh provides reinforcement for the slab, and is a great way to fasten your tubing or wire.
For tubing, we use a cordless rebar tie tool to save wear and tear on our backs and knees. You can find relatively inexpensive models with an internet search. We opted for the professional-grade models due to the massive snow-melt project at Wellspan York Hospital (Read more about that project in the “Adventures in Hydronics Heating with Dave Yates Volume 4” eBook for free). In less than a second, the tool performs a triple wrap of wire (either bare or PVC coated) and twist-tie cutoff in less than a second. Sure beats zip-ties or twisting rebar metal wire ties.
For the most part, residential snow/ice-melting systems will allow some snow/ice to accumulate during the inclement weather and output will be 80 to 125 Btu/h per square foot. Using a manufacturer’s design software is highly recommended unless you are following specific engineering drawings. Most retail and commercial areas require 125 to 250 Btu/h per square foot. The trick here is to not allow snow/ice to accumulate during inclement weather, which often means you will be incorporating automatic controls that will activate and idle the slab based upon actual outdoor weather conditions. If the control senses conditions (humidity and temperature) are right for snow and/or ice accumulation, the slab is energized and idled at preprogrammed energy inputs to obtain a jump-start on accumulations. Accumulation of snow/ice on the sensor pad is evaporated via an internal sensor heater so that all snow/ice has been melted/removed before the sensor will deactivate the heat energy source.
Of utmost importance is your coordination with the concrete gurus onsite. All concrete slabs crack, and that’s the fact, Jack! You don’t want your tubing or wires damaged/stressed by this natural event, so it is vitally important to meet with said gurus to determine how they intend to deal with cracks. More often than not, they will be creating stress-fault lines by way of saw-cutting the slab. A lack of communication here leads to disaster when their depth of saw-cutting cuts through your wires or tubing! This was critical coordination at the Wellspan York Hospital jobsite because that was a high-output snow-melt job requiring 250 to 450 Btu/h output per square foot for areas that included a helipad, emergency room entrance, ambulance bay and bridge.
Additionally, if water tables present any opportunity for direct contact with your radiant snow-melt system, drainage is critically necessary. Why? Great question! Water conducts heat well, and if subsoil water comes into direct contact with your wires or tubing, your system will be toast. Why isn’t my snow-melt system working? I have no idea. Subsurface water is the silent killer for snow/ice-melt systems. Don’t become a victim, drain off that water! I have thousands of feet of perforated drainage tubing under driveways and slabs as a precaution to radiant heating/snow-melt issues. You only get one chance to do this right: Make it count.
OK, we’ve covered tubing/wire spacing and depth from slab surface, so how do you get started doing snow/ice melt systems? Another great question. Define the system: Is this an add-on to a hydronic system, or a standalone application? Either way, you’re going to be incorporating a glycol solution unless this is an electric radiant application. Normally, electric radiant snow/ice systems are smaller areas, but not always, as we encountered for a large corporate grand entrance. Either approach requires you design for the customers’ anticipated desired results. That means, simply, you need to be an effective communicator. What do they want, expect and anticipate, and what is required to meet their expectations? I’m deadly serious here when I say if you miss this step, you’re likely stepping in cow flops! No snow — not ever? You’d best be designing for 450 Btu/h per square foot. After all, it’s not your money — it’s theirs, and your job is to accommodate their wishes and desires. The flip side of that coin, is pricing your installation to be nicely profitable. You deserve nothing less.
Looking for a reprint of this article?
From high-res PDFs to custom plaques, order your copy today!