Tech Topic: PEX Flexible underground pre-insulated PEX piping systems
Underground piping is used for a variety of applications ranging from hydronic heating and cooling to domestic water distribution. Although traditional, rigid piping systems have long prevailed in the marketplace, the installation and performance advantages offered by more flexible options such as crosslinked polyethylene-based piping systems are increasingly being recognized.
PEX pipe is commonly used as the service pipe in these systems due to its inherent mechanical properties such as its ability to operate continuously at temperatures up to 200 degrees Fahrenheit and to provide optimum flexibility during the system’s installation. PEX is manufactured using various methods to create three different piping types: PEX-a, PEX-b and PEX-c.
PEX-a is manufactured using the Engel method, which crosslinks the polyethylene molecules during the extrusion process when polyethylene is in its amorphic state (above the crystalline melting point). This manufacturing process produces the most durable, flexible and high-performing PEX for underground piping applications. In addition, PEX-a can be expanded to accept a high-flow, ASTM F1960, “cold-expansion” fitting.
Flexibility vs. Rigidity
When it comes to underground applications specifically, a pre-insulated PEX-a piping system offers numerous advantages over a rigid one:
Flexible PEX-based piping systems are lighter than rigid piping systems and come in continuous coils rather than segmented pieces.
The inherent flexibility of PEX-based systems eliminates the need to dig a straight or level trench since the coils can curve. It also makes avoiding obstacles easier since the pipe can simply snake around them.
Longer coils mean fewer underground connections for PEX-based systems, translating to a reduced need for robust tools or welders and faster installation times.
Since PEX-based systems do not pit, scale or corrode, they typically have a longer life span than rigid systems. Also, since there are significantly fewer field joints buried in the ground, there is less opportunity for leaks in the system.
The reduced necessary connections, longer coils and lighter weight mean that installers can save up to 67 percent on labor installing a flexible, PEX-based piping system rather than a rigid one. Flexible, PEX-based piping systems can be further segmented into two types for underground applications:
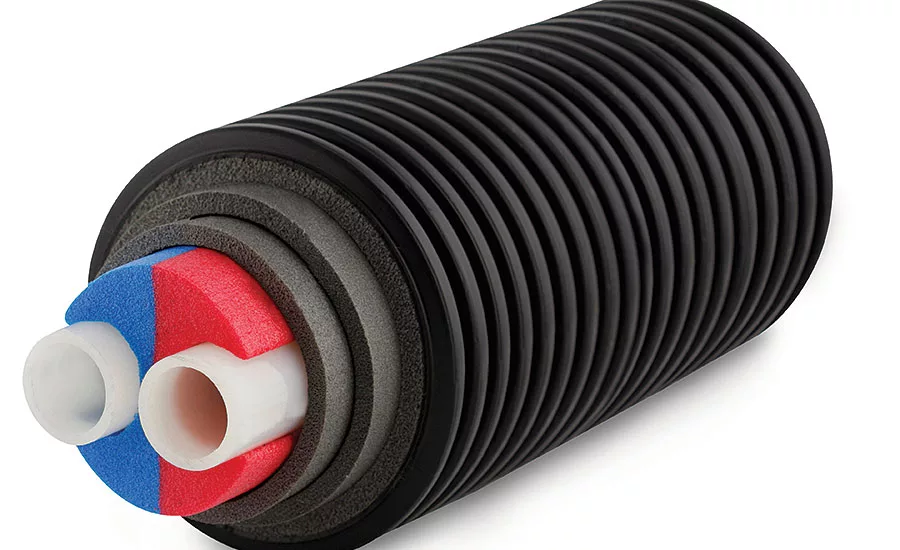
Bonded systems
In a bonded system, the pipe, insulation and jacket (or casings) are all bonded together. The insulation used in these systems is polyurethane. It can be difficult to reach the pipe itself in these systems, as the contractor needs to cut through the jacket and shave the insulation foam.
Slip systems
In a slip system, the pipe is not bonded to the insulation or jacket. Rather, all three components remain separate, allowing for greater flexibility than with a bonded system. Think of a slip system working like a braided cable, whereas the bonded system would function more like a steel rod—with respect to the flexibility. Slip systems are typically insulated with polyethylene. Reaching the pipe and fittings is also easier in a slip system, merely requiring a contractor to cut through each layer.
Both types of these systems are more flexible and installer-friendly than a rigid design, such as black iron. Between the two, however, a slip system offers even greater flexibility and ease of access.
Two Single Pipes vs Twin Pipes
One consideration when deciding to specify and install a flexible, PEX-based underground piping system that contains supply and return lines is whether to choose multiple single pipes or a twin-pipe configuration. A twin-pipe configuration runs two pipes, typically sized up to 2.5 inches or under, inside the same jacket.
Some code jurisdictions do not allow twin-pipe configurations due to their reduced insulation thicknesses, which, all else equal, would translate to greater heat loss in heating applications. However, twin-pipe configurations significantly reduce the amount of surface area exposed to the ground, often cutting it in half. Since surface area impacts heat loss along with other variables, such as conductivity and insulation thickness, the reduced exposure more than compensates for the reduced insulation.
A recent study of twin-pipe versus single-pipe heat-loss performance discovered that thermal performance is increased when twin-pipe configurations are used over two single-pipe configurations buried side-by-side (see Figure B). This is due to the reduction in overall surface area exposed to the ground with twin-pipe configurations versus two single-pipe configurations placed side-by-side.
It’s important to note that in the study, as the temperature differential between the average water temperature and the ground increased, so did the difference in performance between the configurations. In other words, heat loss became significantly less with the twin-pipe configuration than with the two single pipes. In fact, the study demonstrated that the increase in performance by incorporating a supply and return line in the same jacket can be as much as 46 percent with a ∆T of 110 F between the average water temperature and the ground temperature. That would be similar to designing a system with a 160 F supply water temperature, 140 F return water temperature and a design ground temperature of 40 F. Again, as the differential between the average water temperature and the ground increases, so would the differential in performance between a twin-pipe system and multiple single pipes.
Note that a single-pipe configuration might still be recommended when the ∆T between the supply and return pipes is greater than 20 degrees and there is a large difference between the supply water temperature and ground temperature. In this case, a single-pipe configuration would help prevent heat migration from the supply line to the return line as well as minimize the heat loss from the supply line to the ground.
By Don Rackler | Jon Wayne Heating & Air Conditioning
PEX piping is incredibly popular within the contractor community, for good reason: it saves time and makes new plumbing construction, or re-plumbing projects, far easier. Here are some practical tips on how to make handling PEX more straightforward.
When routing PEX, keep the following in mind:
Allow Slack – PEX expands and contracts an inch per 100 feet with each 10 F temperature change. Allow a 1/8-inch slack per foot of PEX. Add loops into long PEX runs, with adequate space for loops to expand and contract without touching studs or joists that surround these loops.
Adequate Support – Hung PEX requires horizontal support every 32 inches, or every six feet when above beams. It needs vertical support on each floor. Joints add weight to PEX, requiring support. Use plastic, not metal, support hangers and straps, and use correctly sized hangers, so they don’t pinch or crimp the PEX.
Route through Stud Centers – Drill access holes through stud and joist centers. Cover studs with metal nail protector plates.
Corner Minimums – Route PEX through elbow support tracks when turning 90-degree corners with the following bending minimums:
Nominal Thickness of PEX Bend No More Than
- 3/8-inch 4-inch curve
- 1/2-inch 5-inch curve
- 3/4-inch 7-inch curve
- 1-inch 9-inch curve
Cutting PEX
Err on the side of seeing a little waste when you’re cutting PEX. Make your initial cut slightly longer. Add a loop for expansion and contraction at the end of your pipe. Finally, make the cut to fit. PEX requires slack, so when you consistently add to your length, all runs of PEX receive their required slack.
Tools for the job
The first prerequisite for professional PEX installers are quality tools for handling this material. You can expect to pay a little less than $200 for a complete set of good PEX tools. An essential for an effective PEX connection is a burr-free, square cut. A clean and square PEX cut consistently occurs when using superior scissor tubing cutters.
Another must-have is a worthy crimp tool for fastening a crimp on each side of a PEX fitting. An alternative is a tubing expander, for a different type of connection. With crimping tools or tubing expanders you need a matching “Go/No Go” gauge. After making the connection, check it against the gauge and if it’s a good connection, it will fit into the “Go” section of the gauge. Poor connections fit the “No Go” area of the gauge. Poor crimps must be tossed, requiring a clamp removal tool.
PEX Connections
The only tool you need for “push-in”-type fittings, is a pair of PEX tube cutters to make a square and clean cut. Install the push-in fitting on the end of the PEX tubing and ensure the pipe is fully seated into the fitting. Push-in fittings are costly, so they should only be used when one or two fittings are required.
When several fittings are involved, use crimp rings. First, make a square, burr-free cut, slide a crimp ring over the PEX tubing, and insert the fitting until the tube’s edge snugs against the fitting’s shoulder. Next, slide the crimp ring over the fitting’s ribs to within 1/8 to 1/4 inch from the tube’s end. Enclose the crimp tool around the crimp ring and press the tool’s handles together. Finally, ensure the crimp is good with the Go/No Go gauge.
Where Not to Use PEX
PEX shouldn’t be used in certain circumstances. Just keep your PEX clear of the following five hazards and you’re golden: Don’t use it after a point-of-use water heater; any closer than six inches horizontally or one foot vertically from recessed light fixtures, exhaust flues, or heating appliances; for swimming pools; around petroleum products; or in direct sunlight, such as unfinished, windowed basements, or left unburied outside.
"This article was originally posted on ww.reevesjournal.com."
Looking for a reprint of this article?
From high-res PDFs to custom plaques, order your copy today!


