I admit it - it takes me at least three times through most new technical material before I get it. I can say that because I’ve been a technical trainer a long time. I think that’s what it takes for most of us, whether we like it or not, and of course we don’t.
My third time through basic combustion analysis was taught by a rep named Steve Duggan. He taught me the first two times, too. So it’s not that the presentation or the material were any different than they had been before. It just finally stuck.
I’m excited about what I learned in his combustion analysis course. It comes down to some very simple measurements that are easy to get when you have a combustion analyzer.
Combustion analyzers used to be expensive and difficult to use. Now they’re easy and are priced reasonably for a business expense and tool. What the numbers meant used to be a mystery. With the help of instructions that come with the analyzer, manufacturer’s data and a rule of thumb from Steve the rep, the numbers make sense.
Data from the combustion analyzer can help you quickly troubleshoot. It allows you to adjust a boiler or furnace for greatest efficiency (oxygen/carbon dioxide percentage and flue temperature), and safety (carbon monoxide level). These numbers can help keep you out of trouble.
About Combustion
Most of the heat we create comes from burning fuel. We put fuel and oxygen together in a process called combustion. The result we get is heat (which we take credit for) and other products of combustion (which we’d prefer to ignore). The days of ignoring the products that go up the flue may be coming to an end because of concerns about efficiency and safety.A combustion analyzer looks a lot like a multi-meter. You just hold it in your hand. To sample the flue products, attach a probe to the analyzer and insert it into the flue. The probe tip has a built-in temperature sensor and has a hose connected, through which the sample is drawn. The display will tell you what’s going on inside the flue.
As instructor Steve points out, you simply set the dial to “flue test.” You drill a hole in the flue, about 1 foot above the boiler and at least 1 foot away from any elbow, but below any source of dilution air such as a draft hood bonnet. Be sure to plug the hole before you leave.
Upon powering up the analyzer, a 60-second countdown begins. It is recommended that this be done outside of the building where the test will be done. The unit’s pump will run and draw ambient air for 60 seconds to clear the probe hose and the sensors. Turning the unit on and clearing it outdoors will enable you to then walk into the mechanical room with the analyzer running and know whether the room is safe by checking for carbon monoxide.
To perform the combustion test, let the appliance run for a couple of minutes and then insert the probe into the flue, attempting to get the tip as close to the center of the flue as possible. If the pump has been turned off, turn it back on, and within 30 seconds you will see readings on the screen.
Once the proper adjustments have been made and the combustion is within specifications, you can press the Save button. This records the real-time readings for printing or copying later.
There are a number of results that the analyzer will give you. According to Steve, the most useful measurements are oxygen (O2), carbon dioxide (CO2), carbon monoxide (CO) and stack temperature.
How To Read The Results
The results appear as numbers on the screen of the analyzer. What do they tell you? The best way to interpret the numbers is according to the specifications given by the equipment manufacturer. Of course, you don’t have this paperwork!It’s likely that you can get equipment specifications from the manufacturer’s Web site. If you don’t have information from the manufacturer, here are some general guidelines from Steve:
Carbon monoxide is bad stuff. It kills people. Code often allows 400 parts per million (ppm), but to be safe you wouldn’t want to see any more than 150 ppm. Seeing above 150 ppm would be a red flag to double-check the combustion. High levels of CO suggest that there’s not enough O2 for the amount of fuel being burned. Or, conversely, there’s too much fuel for the amount of O2. Besides being deadly, high CO levels indicate that there isn’t complete combustion and fuel is being wasted.
Depending on the appliance, you can generally adjust air, fuel or both. If you find high levels of CO, you’d either increase the O2 or decrease the fuel until you find a safe CO measurement in the flue.
Oxygen naturally makes up about 21 percent of our atmosphere. Generally, we need 10 cubic feet of air to burn a cubic foot of natural gas. In a flue, as reported by the combustion analyzer, you would want to find approximately 6 percent to 8 percent oxygen on an atmospheric natural draft boiler or furnace. This is excess O2 that is left over from the combustion process.
Carbon dioxide is typically a calculated number based on the detected amount of O2. CO2 is a normal byproduct of the combustion process. A 7 percent to 9 percent range on the analyzer is typically desirable on the natural draft product.
These are approximate ranges and you should always comply with the appliance manufacturer’s recommendations. The guidelines above are for natural and propane gas. Fuel oil guidelines are different. These numbers also can change based on the type of burner used on the equipment. Mechanically mixing air and gas allows for lower O2 levels and typically better efficiency.
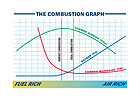
If pictures are helpful, take a look at the combustion graph on page 70. Notice how the levels of oxygen, carbon dioxide and carbon monoxide vary as we approach “ideal combustion” (where we want to be with a boiler or furnace) and “perfect combustion” (perfect to get all the energy out of the fuel, but dangerous because there is no excess air). You can see the effects of “fuel rich” and “air rich” along the bottom of the graph.
There are a couple of visual flame indicators, too. If your flame has a blue cone with orange flame above, it’s probably OK. Pale yellow indicates a possible lack of air and presence of CO. If the flame lifts off of an atmospheric steel tube-type burner, you may have too much primary air entering the burner.
The flue test also tells you stack temperature, which can be another indicator of proper combustion. If, for example, the manufacturer says to expect a stack temperature in the 400-degree F range, and the analyzer is showing you 250 degrees F, you know there’s a combustion problem.
There are other areas the analyzer can give you information. The UEI Eagle analyzer that Steve uses can read two pressures (gas and draft), two temperatures and allow you to perform a furnace heat exchanger test. The analyzer also will give you the difference, known as ∆T, for pressure and temperature.
The combustion analyzer also can be used to test carbon monoxide levels in a living space. It will automatically test at two-minute intervals over a 30-minute period and record the results.
A combustion analyzer can be paired with a hand-size infrared printer, so you can print your results. This is useful for limiting your liability by documenting the conditions when you finished the job. It also adds credibility to our profession by allowing us to provide exact data to the customer about the service provided. And don’t forget to charge accordingly. You’ve proven that you’re worth it!