
These switches at the top and bottom of the stairs are called three-way switches, even though there are only two of them. If you look closely at them, you'll see that there's no on-off marking like you find on a simple switch. That's because either position can be on or off.
“Three-way” means that there are three components in the circuit - two switches and the light(s). And there are three switch terminal screws inside the switch.
If there are three or more switches controlling the same light(s), they are called four-way switches - more on those later. Let's first look more closely at three-way switches.
The circuit has to be wired in a special way, and not the way you might think. It might seem that two simple on-off switches and a light could be wired together one after the other. (See Figure 1.) This would be simple series wiring.

Simple switches in parallel won't work either. Wired that way, either switch could turn the light on. But to turn the light off, both switches would have to be off (See Figure 2.)
Three-way switches are installed in pairs. Each switch has three terminal screws - a darker common (C) and two travelers (T). The two traveler screws are interchangeable with each other. Different manufacturers put the common and traveler screws in various positions. For example, the terminal screw patterns in Figure 3 are electrically the same. This common terminal is connected to the black hot leg coming from the service panel.
There are two possible paths for electricity to take through a two-way switch. It's like a “Y” in a road; inside the switch, electricity goes from the single common terminal to either of the traveler terminals. Electricity will choose the direction where the switching position is closed. Either path takes the electricity to the next switch. There it again has two possible paths through the switch.

Notice that there are three cables in each layout. A two-wire cable (black and white wires) always comes from the service panel.
A three-wire cable (black, red and white) always connects the two switches. Each of the two traveler screws on the first switch may be connected to either of the traveler screws on the second switch.
Depending upon the layout, the third cable may be either two-wire or three-wire.
Notice that, as with loads anywhere, there is always a black (hot) and white (neutral) wire connected to it. If you see two white wires, one is white coded black. That's because the cable doesn't always give you the colors you need. So if you have a white but need a black, you may designate the white as black by marking it with a piece of black tape or a black marker.

Four-Way Switches
Some rooms, such as a kitchen or living room, have more than two entrances. For these we use four-way switches. Four-way means three or more switches. It's easy to move from the three-way switches we just looked at to four-way. Just add a four-way switch between the two three-ways. In fact, you can add as many four-way switches as you need.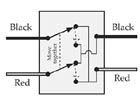
Here's a layout for three switches and a light fixture (Figure 6). It's a three-way switch layout with a four-way switch inserted between the three-ways.
