Radiantly Myopic
As the years went on, I continued to design radiant floor heating systems, using newer methods and materials as they became available. Although I knew that heated walls and ceilings had been built, I still didn't think of them as equally worthy surfaces for radiant panel heating. I continued to limit my systems to radiant floor heating well into the 1990s. As evidence, I titled Chapter 10 in the first edition of my textbook as "Radiant Floor Heating," and didn't even discuss heated walls or ceilings.Eventually, I just had to give heated walls and ceilings a try to satisfy my own curiosity. The opportunity came along in 1999 when we built our own home office. I wrote about our experiences in a July 1999 PM column titled "Wall Warming." If you didn't see it, or just want to refresh your memory, check out this link at www.PMmag.com editorial archives.
In short, I was delighted with the performance of our radiant wall and ceiling panels. As new projects come along, I now look for opportunities to use radiant walls and ceilings wherever they're appropriate.
Here's an example. Have you ever thought about installing a heated wall in the space under an overhanging countertop in a kitchen? It's an out-of-the-way surface right next to the lower extremities of people on stools. It's also a surface not subject to nails from hanging pictures, or from being blocked by a large piece of furniture. Think about the inviting radiant comfort this would offer someone who just came in from a cold winter day.
Another great opportunity is a heated wall in a walk-in shower. This is especially true if one or more of the shower walls is exposed to the outside. A tube and plate system installed over plywood sleepers, and covered with cement board provides a warm, stable and moisture-resistant substrate for ceramic tile finish. Warm walls in a shower not only improve comfort; they also reduce the potential for mold formation, especially on cooler outside walls.
A radiant ceiling is a great choice over a large platform-mounted tub (which most architects love to surround with windows). Not only can the tiled platform around the tub be heated, but the ceiling can provide gentle "indoor sunshine" to compensate for those cool glass surfaces. Many people building luxury bathrooms would love to have such heating if someone simply offered it to them. Figure 1 shows this approach on a recent project with large windows adjacent to the tub platform.

Practicing What I Preach
Last summer, my wife Joyce and I finally had the opportunity to remodel our kitchen. Part of the project was changing the look of the stairwell that divides the kitchen and living room. The stairwell is surrounded by a 42-inch high wood-framed wall, and was originally finished with knotty pine boards.
Joyce saw the opportunity for a clean new drywall surface with decorative oak top. I saw 50 sq. ft. of wall begging to be heated. Talk about a win/win situation. She got the makeover she liked, and I got to install another hydronic heat emitter in our house. Figures 2, 3 and 4 show the original wall, the tube and plates being installed, and the finished product.

We did have to thread the tubing through the corners to avoid cutting the framing. Return bends were just tucked behind the OSB strips in the stud space. The leaders were routed back to the mechanical room through the floor joists. The last step was to install 1/2-inch drywall over the tube and plates. Screws could be driven into the framing as well as into the 7/16-inch OSB for some extra clamping power.
Rock Solid Radiant
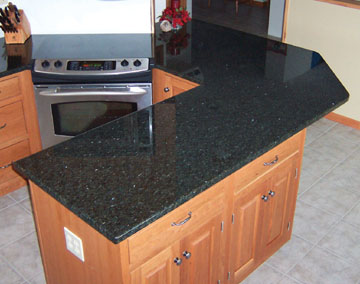
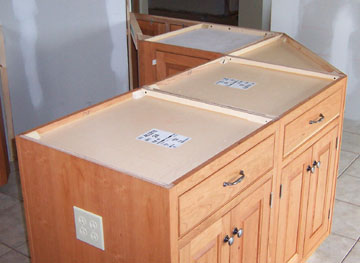
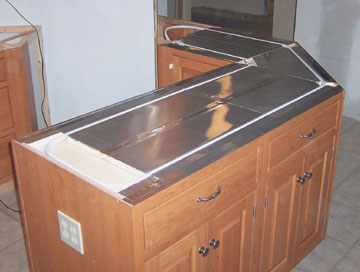
Another surface that I couldn't resist heating was a granite countertop in the new kitchen. The cabinets we installed came with plywood "dust covers" that were recessed down 1 inch from the top of the cabinet frame (see Figure 5).We cut a few pieces of 1-inch foil-faced polyisocyanurate insulation board and glued them in place as sleepers over the dust covers. Solvent-based contact adhesive worked well for this. The gaps between the insulation strips accommodated the grooves in the heat transfer plates. I used the router to remove the top of the cabinet frames at the groove locations.
The top of these plates ended up about 1/16 inch higher than the top of the cabinet frame. When the 400-pound slab of granite was set in place, the upper surfaces of these plates were pressed tightly up against the bottom of the granite for good heat transfer. The foam insulation strips provide a nominal R-6 insulation to direct heat upward into the granite, rather than down into the cabinet. The installation sequence is shown in Figures 5, 6, and 7.
The radiant wall and counter top are supplemental to the radiant floor heating that's already installed in part of the kitchen floor. The radiant stair wall should be capable of at least 40 Btu per hour per square foot, yielding a total heat output of about 2,000 Btu/hr. This would not be sufficient to heat the kitchen. Still, if one were to heat both sides of all walls surrounding these stairs, the estimated output would be about 5,300 Btu/hr. That's approaching the output of 12 feet of typical fin-tube baseboard using a heat emitter that's completely out of sight and out of mind.