You know how the drip, drip, drip from the leaky faucet in the bathroom sink will keep you up at night? In the daytime you never heard or noticed it. But now, in the middle of the night when the house is quiet and free of distracting noises, it's loud and clear.
Locating a water leak professionally is done in much the same way. Though many leak location professionals use the quiet time in the middle of the night to find water leaks, you don't have to.
Leak location is complicated by the fact that the leak is not in the bathroom sink down the hall, but buried below concrete and 6 feet of water-saturated ground.
To locate a water leak like this, you need a way to filter out all the distracting noises -- traffic, wind, air-conditioning compressors, etc. -- that interfere or distract you from hearing the leak. Sophisticated water leak locators do more than just amplify the leak noise, they filter out the ambient noise using a digital spectrum analyzer, which mutes other sounds that interfere with leak location. It does it with a combination of audio filters (the more filters the wider the range) to muffle other sounds and make it easier for you to hear the whoosh or hiss of the water leak.
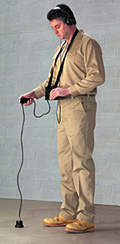
Leak locators use specially designed sensors that listen for the gurgling or hammering of a cracked pipe below ground. A ground sensor locates leaks through hard surfaces like concrete, asphalt and tile. A probe sensor picks up leaks through soft surfaces, such as grass or carpet, or it can be used as a contact probe on above- ground pipes or hydrants. Both should have shock-resistant housings to reduce unwanted noise. And always use a leak locator with a safety switch to protect you from sudden loud noises by muting the sound when the button is released.
Location 101
First, it's helpful to know what the leak sounds like so you know what to listen for. Leak sounds are created by three different situations:- Pipe vibration, the loudest and easiest to detect, is caused by water forced through a crack in the pipe and makes a whooshing or hissing sound.
- Water forced through the crack hits the surrounding soil. The type of material around the pipe affects this sound. If it's rock or gravel, a hammering or knocking sounds may be heard. If loose soil surrounds the pipe, it may be difficult to hear anything at all.
- Water flowing through the soil cavity will create a gurgling sound like a small stream or brook.
Loose or sandy soil, swampy or water-saturated areas, as well as newly buried pipe produce muffled leak sounds that can be harder to find. Thus, a pipe that's been leaking for some time will absorb the leak vibrations making it more difficult to find. Pipe in rocky or hard ground transmits leak sounds best.
Knowing the type of pipe is helpful. Metal pipes transmit sounds at a higher frequency. In cast-iron, copper and steel pipes, you are most likely to hear leak sounds in the range of 500 Hz to 1,500 Hz. In PVC pipe, leak sounds resonate in the range of 70 Hz to 850 Hz.
Choosing the right combination of high-end and low-end filtering will remove the extraneous noises of equipment, wind, traffic, etc. To filter out all the higher and lower frequencies, push the high and low frequency buttons on the digital spectrum analyzer until the indicator lights are on those frequencies.
The deeper the pipe, the harder it will be to find the leak because soil absorbs leak sounds quickly. It's difficult to find leaks in lines buried deeper than 8 feet. To find leaks in deeper lines, the water pressure must be increased to amplify the sound.
The surface material also will affect the amplification of leak noises. A hard surface like concrete will resonate with the sound of a leak for 5 to 10 feet around the water pipe, while grass and earth do not assist in the amplification of leak noise. Select the proper sensor for the surface on which you are locating.
Pinpointing Leaks
The most common indicators of a domestic water leak are a dramatic increase in a water bill or hearing water running all the time.If you don't see any obvious evidence of a major water leak, like "ponding" or loud leak sounds, then start a water leak survey. Use the probe sensor and probe bar to survey the hydrants and main valves. If you hear the sound of a leak at one location, check lines running in all directions from that point. The leak location is usually found between the loudest and second loudest survey locations. Then you can begin to narrow down your search.
Start by locating the route of the water line by using a pipeline locator and transmitter. Attach the transmitter leads to each end of the pipe to be located, and then turn on the transmitter. Turn on the locator and set the frequency to pipe location mode (usually 65 kilohertz, but some systems use other frequencies). Make sure the blade of the locator is perpendicular to the ground and across the pipe (rather than in-line). Mark the surface as you locate the path of the water line.
Select the appropriate sensor. Then walk the line, taking a reading every 3 or 4 feet. Follow the flow of the water line, from upstream to downstream, and note each reading. Do not adjust the volume control. The volume must remain constant in order to make accurate comparisons. When you are very close to the leak, you may be able to discern the location of the leak with your hearing alone. If you are unable to rely on your hearing alone, use the LED meter indicator to assist in locating the strongest signal in the area.
Tips For Beginners
If you are new to leak location, you must learn the sound of a leak before you start your search. Set up the water leak locator with the probe sensor attachment. Touch the tip of the probe bar to the cold water line under a sink. Then turn on the valve just a little bit so the water is dribbling out of the faucet. This simulates the sound of a leak. Turn the valve on and off as you listen until you hear the difference.The rest of leak location is a process of elimination. Assume that you've got a leak if the water meter is registering water flow, yet all the valves in the house are closed. The rest of your job is to isolate the leak. Use the probe sensor on all sink lines, hot water heater lines and hose bibs to get a general location of the leak. Suspect older parts of the system or areas with a history of leaks, and of course, any recent excavations.
The art of locating water leaks takes patience, practice and the right tool. If you have one with the right combination of digital audio filters, high quality headphones and high sensitivity sensors, you'll be able to find even the smallest leaks.